What will you learn in this post?
I have introduced what HTML, CSS and JavaScript are and how they can work together in my previous post. In this post, we will have a deeper understanding of HTML and learn to make Web pages step by step.
#Before We Start
You can use your favourite text editor to write the examples as shown in this post. If you don’t have a preference, I would recommend eithor Notepad++ or Komodo Edit.
Install Chrome or Firefox if you haven’t. You will need Firebug for Firefox in later posts.
You can open the *.html files using your favourite browsers to see the results. No server in needed by the end of this post.
#Tags
Remember that HTML is responsible for the content of a Web page? This means when you want to add text, buttons, images, videos, sound, and etc., HTML is the one to call for.
Tags are used to state the type of the element in an HTML file, e.g. p is used for a paragraph, <img> for an image, and as you can imagine, <video> for a video. Here’s the complete list of HTML tags: HTML element reference - Mozilla Developer Network
Luckily, you don’t have to remember all these. :relaxed: I’m going to introduce the most frequently used ones and the other ones can be left until you meet with them in a particular usage.
All the following tags should appear inside the <body></body> part.
##<p>
The HTML
<p>element (or HTML Paragraph Element) represents a paragraph of text. Paragraphs are block-level elements.
<p>This is the first paragraph. This is the first paragraph. This is the first paragraph. This is the first paragraph. This is the first paragraph.</p>
<p>This is the second paragraph. This is the second paragraph. This is the first paragraph. This is the second paragraph. This is the second paragraph.</p>
This is the default style a Web broswer may probably render it into. But you can always write your own CSS style to overwrite the default style. A <p></p> has margin above and below it. A margin is a distance outside current element to keep it from other ones, which will be discussed more in the next post.
Web browsers have default style to render each element, e.g. there is margin above and below each
<p></p>element. Browser default style has the lowest priority, following by external style, internal style and inline style. So an inline style can always overwrite all other styles in most cases, without considering the effect caused by!important. We can discuss this topic in future posts.
By probably I mean different Web broswers, or even differnt versions of browsers may possibly have different rendering results of a Web page. By this time, you don’t have to worry about this to much.
We prefer <p></p> not only for the margin, but more importantly, for its representation of a paragraph. :star:
##<br>
This is a useful tag, but usually abused by those bad Web programmers. :anger:
The HTML
<br>Element (or HTML Line Break Element) produces a line break in text (carriage-return). It is useful for writing a poem or an address, where the division of lines is significant.
Do not use
<br>to increase the gap between lines of text; use the CSS margin property or the<p>element.
Using a line break is more like changing the appearance rather than content, so it should be avoided when possible. Use <p></p> when you want to display paragraphs and use <br> only when the content between two lines is the same thing and you just need a line break to seperate them visually.
Another thing you need to notice is that, although most HTML tags come in pairs, there are some exceptions. <br> is one of them.
How to remember which ones are the exceptions? Usually, those who never have a child element can come alone, like <br>, <img> and <hr>. You can never imagine what element can come inside a line break, an image or a horizontal rule.
A good habit is to write them like <br />, <img />, <hr /> so that you can clearly see that they don’t come in pairs.
You should always write
<script></script>in pairs even if it’s for external JavaScript and have no child element.
##<hr>
In HTML5 the HTML
<hr>element represents a thematic break between paragraph-level elements (for example, a change of scene in a story, or a shift of topic with a section). In previous versions of HTML, it represented a horizontal rule. It may still be displayed as a horizontal rule in visual browsers, but is now defined in semantic terms, rather than presentational terms.
From the definition, we can see that in HTML5 (the fifth edition of HTML) <hr> comes from a horizontal rule as appearance to a thematic break as content.
<p>This is the first paragraph. This is the first paragraph. This is the first paragraph. This is the first paragraph. This is the first paragraph.</p>
<hr />
<p>This is the second paragraph. This is the second paragraph. This is the first paragraph. This is the second paragraph. This is the second paragraph.</p>
##Heading Elements
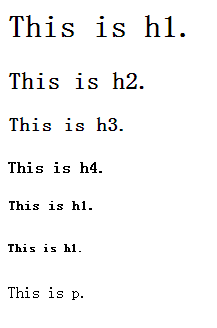
Heading elements implement six levels of document headings,
<h1>is the most important and<h6>is the least. A heading element briefly describes the topic of the section it introduces. Heading information may be used by user agents, for example, to construct a table of contents for a document automatically.
Heading elements of different levels are used to state the section they belong, rather than representing different appearance.
<h1>This is h1.</h1>
<h2>This is h2.</h2>
<h3>This is h3.</h3>
<h4>This is h4.</h4>
<h5>This is h1.</h5>
<h6>This is h1.</h6>
<p>This is p.</p>
##<img>
The HTML
<img>Element (or HTML Image Element) represents an image of the document.
URL of the image should be stated like: <img src="abc.png" />, and its location is eithor relative to this HTML file or absolute.
##<a>
The HTML
<a>Element (or the HTML Anchor Element) defines a hyperlink, the named target destination for a hyperlink, or both.
Use the href attribute to state the location of the link and it’s useful to set the target attribute to be _blank when you want browsers open a new tab for the new link.
Welcome to visit my <a href="http://zhangwenli.com" target="_blank">personal site</a>!
If you want to put a link on an image, you can simply use this:
<a href="http://zhangwenli.com" target="_blank">
    <img src="abc.png" />
</a>!
##List
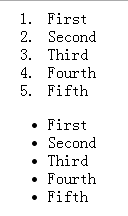
There are two types of lists in HTML, <ol> for ordered list and <ul> for unordered list, both of which have <li> children for list items.
<ol>
    <li>First</li>
    <li>Second</li>
    <li>Third</li>
    <li>Fourth</li>
    <li>Fifth</li>
</ol>
<ul>
    <li>First</li>
    <li>Second</li>
    <li>Third</li>
    <li>Fourth</li>
    <li>Fifth</li>
</ul>
##Form
Form is frequently used in Web pages for registering, contact, and etc. You can search <input>, <button>, <label>, <textarea>, <select> for later use.
##Table
The HTML Table Element (
<table>) represents data in two dimensions or more.
A typical table looks like:
<table>
    <tr>
        <td>Alice</td>
        <td>Bob</td>
        <td>Clair</td>
    </tr>
    <tr>
        <td>Danny</td>
        <td>Elizabeth</td>
        <td>Fay</td>
    </tr>
</table>
<tr> is for a row of cells, and <td> is for a cell containing data.
##<div> and <span>
Now are the last two (and yet the most frequently used two) tags I would like to introduce today! :smiley:
The HTML
<div>element (or HTML Document Division Element) is the generic container for flow content, which does not inherently represent anything. It can be used to group elements for styling purposes (using the class or id attributes), or because they share attribute values, such as lang. It should be used only when no other semantic element (such as<article>or<nav>) is appropriate.
<div>This is the first paragraph. This is the first paragraph. This is the first paragraph. This is the first paragraph. This is the first paragraph.</div>
<div>This is the second paragraph. This is the second paragraph. This is the first paragraph. This is the second paragraph. This is the second paragraph.</div>
Note that this looks quite like that of <p></p>, with the difference that this don’t have a margin above and below the elements. Then, when should we use <div></div>? Should we use it when we don’t want the margin?
No! :scream:
The margin is the appearance while HTML should only be responsible for the content! :star:
The HTML
<span>element is a generic inline container for phrasing content, which does not inherently represent anything. It can be used to group elements for styling purposes (using the class or id attributes), or because they share attribute values, such as lang. It should be used only when no other semantic element is appropriate.<span>is very much like a<div>element, but<div>is a block-level element whereas a<span>is an inline element.
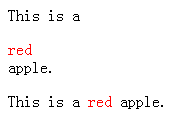
Let’s look at this example to see the difference between <div> and <span>.
<p>This is a <div style="color: red">red</div> apple.</p>
<p>This is a <span style="color: red">red</span> apple.</p>
<span> is an inline container, which means it won’t put the element into a new line, while <div> on the other hand does.
Both of <span> and <div> are generic inline container, so you should use them only when there are no more proper tags to use. And that’s why I need to introduce them at last.
##Use Them Together
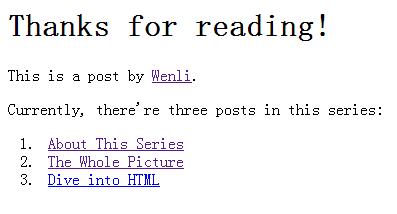
I have all the ingredients and let’s cook a fantastic meal! :v:
<h1>Thanks for reading!</h1>
<p>This is a post by <a href="http://zhangwenli.com">Wenli</a>.</p>
<p>Currently, there're three posts in this series:
    <ol>
        <li>
            <a href="http://zhangwenli.com/blog/2014/04/27/00-about-this-series/">About This Series</a>
        </li>
        <li>
             <a href="http://zhangwenli.com/blog/2014/04/27/01-the-whole-picture/">The Whole Picture</a>
        </li>
        <li>
            <a href="http://zhangwenli.com/blog/2014/05/02/02-dive-into-html/">Dive into HTML</a>
        </li>
    </ol>
</p>
#Id
An id is a universal name for later selection and operation in CSS and JavaScript.
<div id="myName">Wenli</div>HTML is case-insensitive, so if there is an element of id="myName", there shouldn’t be another element of id="myname". Otherwise may cause confusion since CSS is case-insensitive while JavaScript is case-sensitive.
An id is not mandatory, so you can add id to important elements or those you will select in CSS or JavaScript.
#Class
A class is a group of elements that share the same attributes or need to be operated together. For example, you can select all the elements with class price in JavaScript to calculate the sum, or set the background-color of class price to be yellow.
<div id="firstSeason" class="price">1.3</div>
<div id="secondSeason" class="price">3.2</div>
<div id="thirdSeason" class="price">6.2</div>
<div id="fourthSeason" class="price">3.5</div>
id and class are called attributes of an element. Other attributes are written in the same style. The full list of attributes is available at HTML attribute reference - Mozilla Developer Network.
#Conclusion
In this post, we learned about some most frequently used tags in HTML and their id and class attributes. We learned to write the content of a Web page, despite of its appearance. In the next post, we’re going to dive into CSS and there will be more things we can to do with them together. :sunglasses:
#Homework
Write a single-page introduction of your favourite movie or book. Use the tags introduced as much as possible.
Use no CSS or JavaScript. Sometimes CSS or JavaScript files may be inaccessible in our Web pages. We need to make sure the content can still be readable without CSS or JavaScript.
You can always email me if you have any question! :yum:

