A shader is software which runs on a graphics card to determine how an object should be drawn. Source uses shaders for everything in the 3D world. Shaders are manipulated with parameters stored in material files.
GLSL is the OpenGL Shading Language, with which we can write amazing shaders like those on Shadertoy.
With Three.js, the process of writing shaders is made much easier. You may write shader programs by yourself as the example shows. On the other hand, Three.js provides many frequently used shaders so that you can apply shader effects by simply doing like this.
var edgeShader = new THREE.ShaderPass(THREE.EdgeShader);In this post, we are going to introduce how to use THREE.ShaderPass to write shaders for video from local camera and get pixel data from the rendered composer. We will take THREE.EdgeShader as example and read the rendered edges from it.
We are going to introduce in the following steps.
-
Render local video to a plane in Three.js
1.1 Including files and set up environments 1.2 Getting video from local camera using
getUserMedia1.3 Creating a plane and use video as texture -
Set
THREE.EdgeShaderto video texture2.1 Including shader files 2.2 Using
Three.EffectComposer2.3 Reading pixels
By the end of this post, you will be able to implement the effect at demo 2.3 and get the number of non-zero pixels on the screen.
1. Render local video to a plane in Three.js
The result of this step is available at demo 1.3.
1.1 Including files and set up environments
If you are familiar with Three.js, this step may looks extremly easy for you.
We include the three.js file from build directory of Three.js repo on GitHub. And set up Three.js environment very simply, and create a canvas of size 400x300px.
<!DOCTYPE html>
<html>
    <head>
        <script type="text/javascript" src="http://zhangwenli.com/Polyvia/vendor/three.js"></script>

        <script type="text/javascript">
            function init() {
                var canvas = document.getElementById('mainCanvas');
                var renderer = new THREE.WebGLRenderer({
                    canvas: canvas
                });
                renderer.setClearColor(0x000000);
                var tmpScene = new THREE.Scene();

                // camera

                // canvas size is 400x300

                var camera = new THREE.OrthographicCamera(-2, 2, 1.5, -1.5, 1, 10);
                camera.position.set(0, 0, 5);
                tmpScene.add(camera);
            }
        </script>
    </head>

    <body onload="init()">
        <canvas id="mainCanvas" width="400px" height="300px" ></canvas>
        <p>Black canvas is expected here.</p>
    </body>
</html>
The result of this step is available at demo 1.1.
1.2 Getting video from local camera using getUserMedia
Next, we use navigator.getUserMedia to get the access to local camers.
// local video

var video = document.createElement('video');
navigator.getUserMedia = navigator.getUserMedia
	|| navigator.webkitGetUserMedia
    || navigator.mozGetUserMedia
    || navigator.msGetUserMedia;

if (navigator.getUserMedia) {
    navigator.getUserMedia({
        video: true
    }, function (stream) {
        video.src = window.URL.createObjectURL(stream);
        video.onloadedmetadata = function(e) {
            video.play();
        };
        video.width = canvas.width;
        video.height = canvas.height;
    }, function (err) {
        alert('Request camera failed');
    });
} else {
    alert('getUserMedia not supported');
}
The result of this step is available at demo 1.2.
1.3 Creating a plane and use video as texture
Next, we need to draw the video onto the canvas using Three.js. You may probably ask why not draw using canvas. This is because we will add shader effects afterwards, and thus we have to draw it using WebGL, which is in our case, using Three.js.
We first create a canvas named videoImage to draw the video onto. And then create a THREE.Texture named videoTexture, which is used as the map of the material of a plane whose position is just about the screen.
var videoImage = document.createElement('canvas');
videoImage.width = canvas.width;
videoImage.height = canvas.height;

var videoImageContext = videoImage.getContext('2d');
// background color if no video present

videoImageContext.fillStyle = '#ff0000';
videoImageContext.fillRect(0, 0,
    videoImage.width, videoImage.height);

videoTexture = new THREE.Texture(videoImage);
videoTexture.minFilter = THREE.LinearFilter;
videoTexture.magFilter = THREE.LinearFilter;

var videoMaterial = new THREE.MeshBasicMaterial({
    map: videoTexture,
    overdraw: true
});
var videoGeometry = new THREE.PlaneGeometry(4, 3);
var videoMesh = new THREE.Mesh(videoGeometry, videoMaterial);
videoMesh.position.set(0, 0, 0);
tmpScene.add(videoMesh);
Slow down to understand the above code carefully. And ask yourself, how is video passed to all these elements?
The answer is that we need to modify the callback function video.onloadedmetadata. In the following lines of code, this.videoWidth and this.videoHeight are the size of local camera, and we set that of canvas videoImage to be the same, so that the canvas renders only the video content, and without any black area. This is very important since it may bring about problems of position if we don’t do so.
Note that we set videoTexture.needsUpdate to be true so that when our renderer renders the plane with videoTexture, it knows the texture should be updated.
video.onloadedmetadata = function(e) {
    videoImage.width = this.videoWidth;
    videoImage.height = this.videoHeight;
    video.play();

    renderFrame();
};

function renderFrame() {
    videoImageContext.drawImage(video, 0, 0);
    if (videoTexture) {
        videoTexture.needsUpdate = true;
    }
    renderer.render(tmpScene, camera);
    requestAnimationFrame(renderFrame);
}
Now, we can see the effect of rendering local camera at demo 1.3.
2. Set THREE.EdgeShader to video texture
2.1 Including shader files
Three.js shader files are available at examples/js/shaders, which are not part of three.js or three.min.js in build directory. To use them, we need to include the corresponding files.
<script type="text/javascript" src="./three.CopyShader.js"></script>
<script type="text/javascript" src="./three.EdgeShader.js"></script>
<script type="text/javascript" src="./three.EffectComposer.js"></script>
<script type="text/javascript" src="./three.MaskPass.js"></script>
<script type="text/javascript" src="./three.RenderPass.js"></script>
<script type="text/javascript" src="./three.ShaderPass.js"></script>
2.2 Using Three.EffectComposer
Then, we create several passes to enable the shader effect.
var renderPass = new THREE.RenderPass(tmpScene, camera);

var edgeShader = new THREE.ShaderPass(THREE.EdgeShader);

var effectCopy = new THREE.ShaderPass(THREE.CopyShader);
effectCopy.renderToScreen = true;

var composer = new THREE.EffectComposer(renderer);
composer.addPass(renderPass);
composer.addPass(edgeShader);
composer.addPass(effectCopy);
These passes work like a pipe. RenderPass passes the rendered texture in tmpScene to EdgeShader. EdgeShader uses edge detect algorithm to modify the edges in the texture to be white and other to be black, then passes to CopyShader to copy to screen. EffectComposer is used to compose these three passes and form into a pipeline.
And next, use composer.render(); instead of renderer.render(tmpScene, camera);.
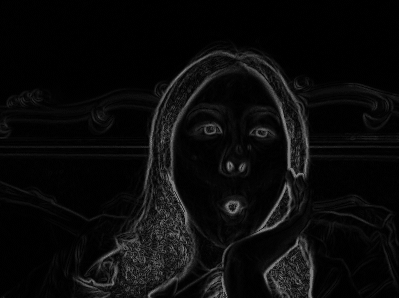 The result of this step is available at demo 2.2. Now, you are supposed to get something like this… if you are as cute as me! :joy:
2.3 Reading pixels
Then, we can read the pixels from this canvas to get pixel information from GPU to CPU.
CAUTION!! This is extremely time-consuming!!
Then why?
Well, I guess this is not a very common requirement. So when I searched for this solution, I hardly found any. And this is also why I write this post. I will use the pixel data to form vertices on the edges to make Delaunay Triangles. So I guess this is a must-be-paid large cost.
In renderFrame, we add the following lines to read pixels.
var pixels = new Uint8Array(canvas.width * canvas.height * 4);
var gl = renderer.getContext();
gl.readPixels(0, 0, canvas.width, canvas.height, gl.RGBA, gl.UNSIGNED_BYTE, pixels);
Here, pixels is a one-dimensional arrary that contains colors in the order of [red1, green1, blue1, alpha1, red2, green2, blue2, alpha2, ...]. So we can output the count of non-zero red elements to make sure the pixels are read correctly.
function getNonZeroCnt(arr) {
    var cnt = 0;
    for (var i = 0, len = arr.length; i < len; i += 4) {
        if (arr[i] > 0) {
            ++cnt;
        }
    }
    return cnt;
}
The result of this step is available at demo 2.3.
Conclusion
This post provides a solution to get pixels from canvas rendered using EffectComposer.

