What will you learn in this post?
You can now display pageview information from your Google Analytics in your blog hosted anywhere! No server required. Pure JavaScript. This post introduces how to do it with Google Analytics superProxy.
Yeap! Another post about Jekyll! :smirk:
How did I get there?
For those just want to know how to make it, just skip to next section.
I wanted to displace how many people have visited the post in my blog. I knew, somehow, Google Analytics could provide me the information. But it really took me a long time to get it done eventually.
I built this site using Jekyll hosted on GitHub, which means I don’t have access to any dynamic page or _plugins feature of Jekyll. After some searching, I thought of the following alternatives.
Jekyll-ga
Jekyll-ga is a plugin for loading Google Analytics data into Jekyll. One possible alternative is to build the site locally and then upload the generated site to GitHub.
I admit that Jekyll-ga seems to be a nice plugin for those hosted other than GitHub. But for me, I didn’t like this idea much since I had either to leave the source file of my blog untracked or to use two repos for source code and generated code respectively. Either way seems ugly to me. But since my options are quite limited, I tried it, but failed. Considering how ugly this way may be, I quickly moved on before finding out why I failed.
Core Reporting API of Google Analytics
Google Analytics provides sufficient APIs for retrieving information from it.
It provides Java, Python, PHP, and JavaScript API. Since I host my blog using Jekyll on GitHub, it seems JavaScript is my only option. But in fact, Core Reporting API seems to be designed for scenarios like management dashboard, which needs users to authenticate using OAuth 2.0. Apparently, I can’t make visitors to my blog authenticate it with my own Google account for Analytics!
So my idea was to write some script, in Python, perhaps, to retrieve the information using Core Reporting API after I authenticate it each time when I update my blog and then write to a JSON file. When someone visits my blog post, it get the information in that JSON file from JavaScript.
I think it might work, of course, with great effort. Its drawback is that the pageview will only update when I manually run the script, authenticate it, generate JSON file, and push to GitHub. If I didn’t write blog for some time, I may probably forget to update the JSON file. And of course, authenticating every time is very annoying.
Google Analytics superProxy
Then, someone replied me on my question on StackOverflow and recommend me of Google Analytics superProxy, which is the final solution I would like to talk about in this post.
Using superProxy
You may first refer to superProxy README for information. But since Google App Engine (GAE) has upgraded, some UI has new names, which makes it harder to get it done. This video tutorial on YouTube is also of great help.
Next, I’m going to explain the changed part in superProxy README.
Create Project
We need to create a project at Google Developers Console. My project id is ovilia-blog-1234, so it will be hosted on ovilia-blog-1234.appspot.com.
Create Client ID
-
In Google Developers Console, click
APIS & AUTH>Credentials>Create New Client ID. -
Choose
Web application. -
Set
AUTHORIZED JAVASCRIPT ORIGINSto be your project URL. For me, it’shttps://ovilia-blog-1234.appspot.com. (Note that you need to enter the protocal here. ) -
Set
AUTHORIZED REDIRECT URIto behttps://xxx.appspot.com/admin/auth. (Replacexxxwith your project ID. ) -
Click
Create Client ID.
You can follow the next steps according to superProxy README.
Using GAE
superProxy README said quite clear on that. But I spent much time debugging on some OpenSSL problem (and I still don’t now how to solve it now) when I used Ubuntu. When I switched to Mac, it just worked!
Create Query
Test your query well on Google Analytics Query Explorer 2.
When it works, you should see something like this.
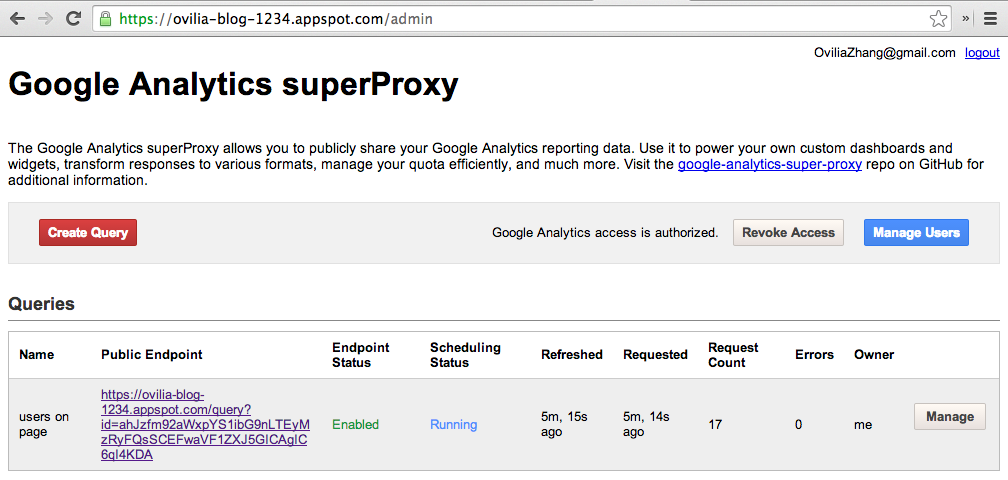
If you visit the link in the image, you can get the JSON file of pageview information!
Final Touches
Now, you just need to call AJAX for the JSON file with your blog’s JavaScript.
Since GAE may not be accessed sometime, I cached the JSON file to GitHub host so that when AJAX call for JSON on GAE fails or has no response in 30 seconds, it will call that from GitHub, but with some acceptable inconsistence.
if ($('#page-view').length > 0) {
    // load pageview if this page has #page-view div

    $.ajax({
        url: 'https://ovilia-blog-1234.appspot.com/query?id=ahJzfm92aWxpYS1ibG9nLTEyMzRyFQsSCEFwaVF1ZXJ5GICAgIC6qI4KDA',
        dataType: 'jsonp',  // for cross-origin access

        timeout: 1000 * 30, // 30 sec

        success: function(data) {
            processPageView(data.rows);
        },
        error: function() {
            // if fail to get up-to-date data from GAE, get cached local version

            console.log('Failed to get page view from GAE!');
            $.ajax({
                url: '/blog/pageview.json',
                dataType: 'json',
                success: function(data) {
                    console.log('Local page view used.');
                    processPageView(data.rows);
                }
            })
        }
    });
}
I use ga:users for metrics and ga:pagePath for dimensions. There may be http://zhangwenli.com/blog/?reference=weibo and http://zhangwenli.com/blog/?reference=douban in different rows of data, so I need to sum them up.
function processPageView(rows) {
    if (rows === undefined) {
        return;
    }
    var myPath = window.location.pathname;
    var len = rows.length;
    var cnt = 0;
    for (var i = 0; i < len; ++i) {
        var thatPath = rows[i][0];
        if (thatPath === myPath || thatPath.slice(0, thatPath.indexOf('?')) === myPath) {
            cnt += parseInt(rows[i][1]);
        }
    }
    updatePageView(cnt);
}
Oh. We’re almost complete now. We can make the display of pageview more interesting! :smirk:
function updatePageView(cnt) {
    var txt = '';
    if (cnt === 0) {
        txt = 'WoW! You seems to be the first visitor to this page! Thanks for visiting! :thumbsup:';
    } else if (cnt === 1) {
        txt = 'You\'re the 2nd visitor to this page. Come earlier next time! :smirk:';
    } else if (cnt === 2) {
        txt = 'You\'re the 3rd visitor to this page. Not bad! :grin:';
    } else if (cnt < 10) {
        txt = 'You\'re the ' + (cnt + 1) + 'th visitor to this page. Thanks for support! :kissing_closed_eyes:';
    } else if ((cnt + 1) % 100 === 0) {
        txt = 'You seems to be the ' + (cnt + 1) + 'th visitor to this page! Lucky you! :open_mouth:';
    } else if (cnt < 200) {
        txt = 'You\'re the ' + (cnt + 1) + 'th visitor to this page.';
    } else if (cnt < 1000) {
        txt = 'You\'re the ' + (cnt + 1) + 'th visitor to this page. Why didn\'t come earlier to visit me! :rage:';
    } else {
        txt = 'You\'re the ' + (cnt + 1) + 'th visitor to this page. I guess I get popular recently. :satisfied:';
    }
    $('#page-view').text(txt);
}
I set the refresh rate of superProxy to be 10 minutes. But since you may get the cached version from GitHub, it’s not always accurate. And the metrics is set to be users so that when one visit the same page some days later, it will not be counted as another visit.
Come first next time! :yum:

